


Posted 13 years ago
Sandra
(11 items)
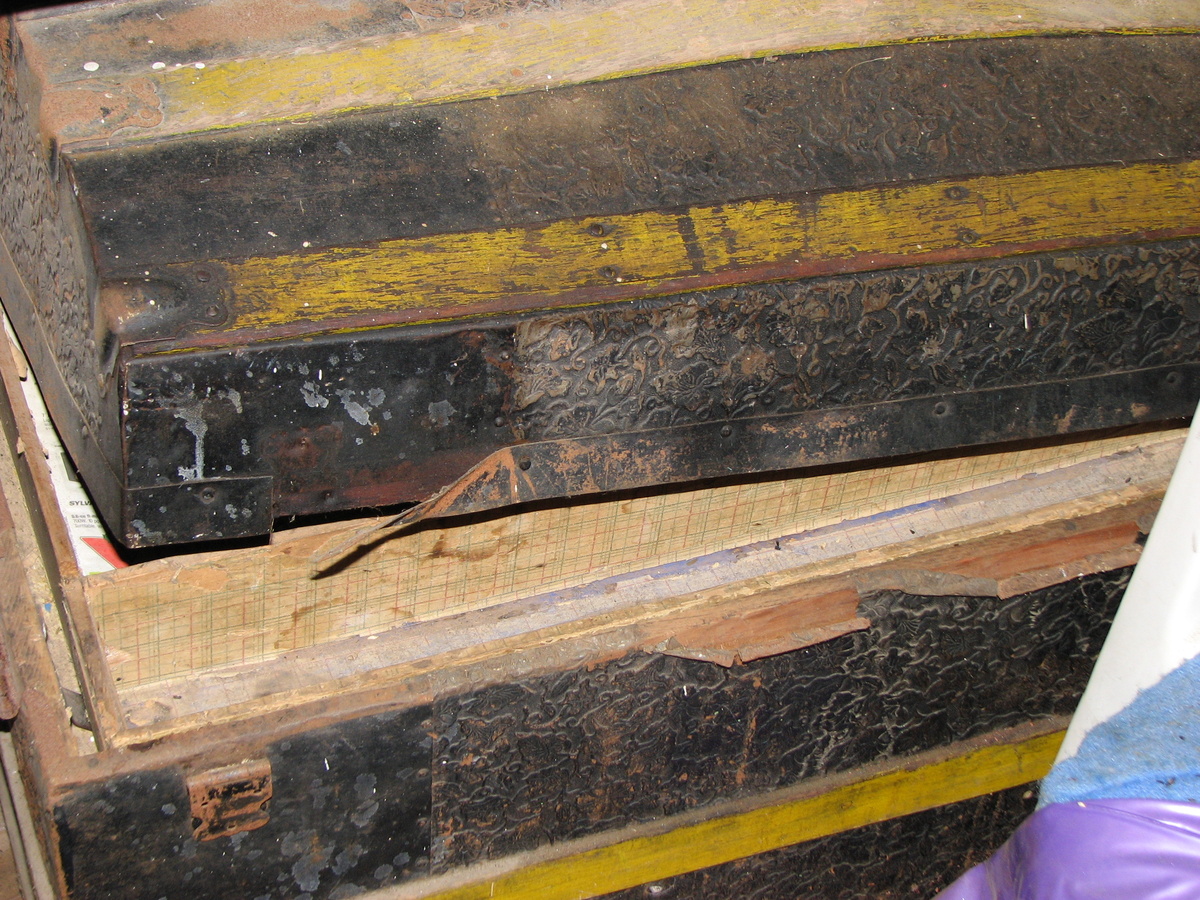
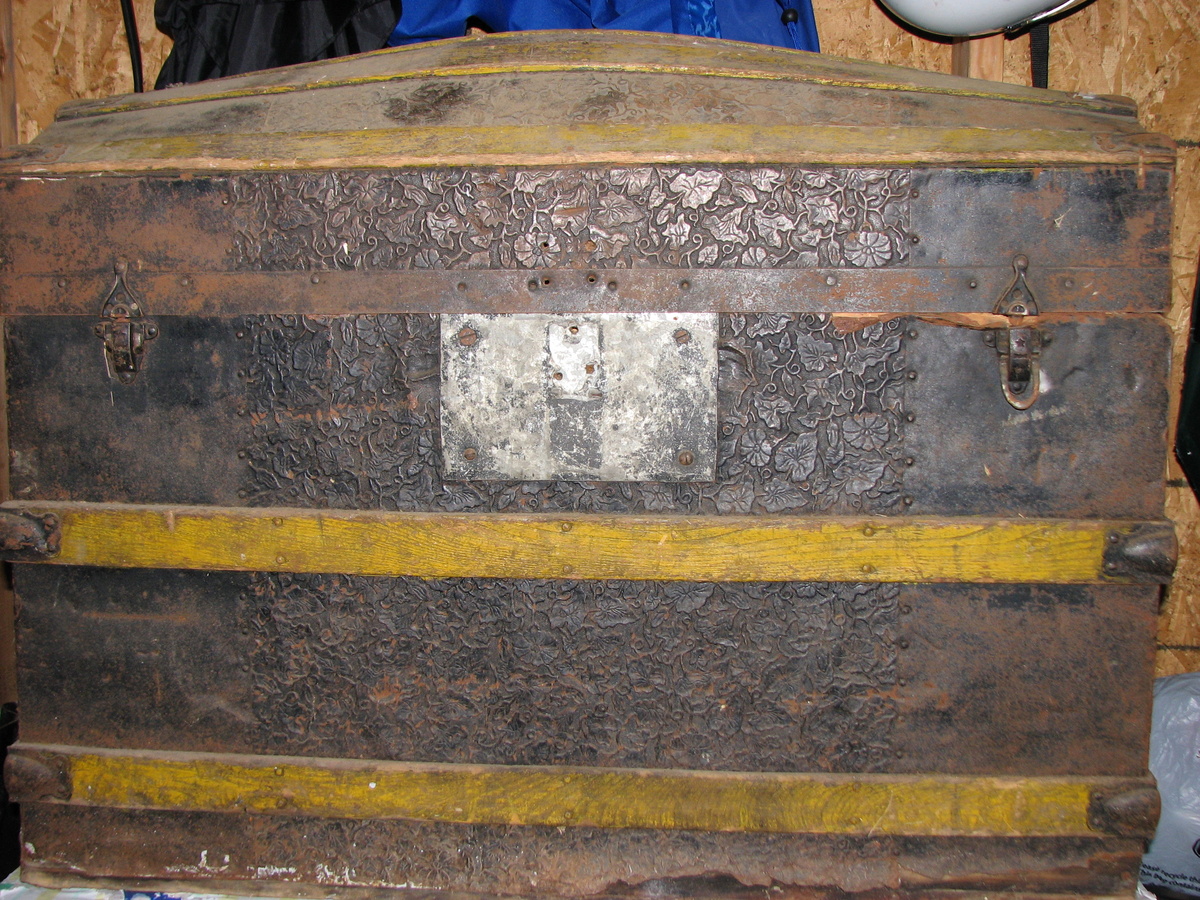
This is my husbands Grandmother's steamer trunk that was in our shed and I recently took it out hoping to clean it up and us it in the house to store photos etc. The hinges on the back are there but not attached to top and the nails are missing. The front lock is completely off along with the front (I don't know what to call them) they hold the lid closed also. I need to take more photos of the front and inside but have not had time yet. The embossed tin is coming off in places and the handles are missing. I don't know how old this is or who made it. The inside needs to be fixed as the paper is coming off and there is water damage stains also. The picture is still inside the lid and the tray is also there which also needs alot of TLC. I'm not sure if I can make it look good but I am willing to give it a try. Is it better to remove the embossed tin or just leave what is there and remove only the parts that are folded back? I am hoping to at least make it presentable to have in my house. I'm not sure if the metal on the side and front middle was added later or is original? I am going to remove the paper inside but keep the picture. Is there anything I can put over the picture to preserve it as it is already starting to tear? Thanks for looking.


A good reference for how to restore trunks: http://www.shenandoahrestoration.com/Hints.html
There are collectors on here better versed in these old trunks. My first thought looking at the unusual shape of the lid is perhaps it's a Bevel Top trunk in which case those were made 1870 - 1880 and then again 1890 - 1905.
Thank you for your link on how to restore trunks. It seems very helpful. Also thank you for an idea of how old this trunk may be. I will post new pictures to see the top better and inside also.
I just added different pictures of the trunk.
I am no expert, but this is more likely what alot of people refer to as a barrel stave, bevel tops wee more squared off on the edges. From what I can tell the embossed tin appears to be all there, some needs tackin back and of course cleaning and repainting. embossed tin can be quite tricky, but it would be more original and rare. Looks like some of the wood needs repairing, especially where the hinges were. Hardware and wood slats appear in good shape, so if you are careful you can reuse them. A lock similar to what was on there would be in the 50-100 dollar range, draw bolts about 20. The metal on the sides is probably original. The hard restoration would be to leave the embossed tin, the easier to remove it and stain the wood. Neither will be easy.
It would be a shame to remove the embossing, it is known as scroll type I believe.
It would be beautiful repainted. The paper on the inside needs removing first, then check for any wood damage and loose nails. Definitly save the picture, just cut it out in a large square, can trim it down later. Having the tray is rare, so will need to clean it up and restain.
You can stain, repaper, or put a cloth or cedar lining on the inside. Definitely use original or replica parts, nails, hardware etc. They are sold at several professional trunk restoration sites on line. You are looking at probably 150 to 200 in supplies if you do it your self. A professional would charge probably 500 or more, but it would be beautiful. You should really look at some of the professional sites. I guy like me ( i am not a professional, but do decent work) would charge around 300. Of course if you sent it out you would have to consider shipping cost. I have some pictures on here at senor_trunks of a couple I've done. Trunker Marvin has pics on here too he also has a web page at thisoldtrunk.com, he is a true expert and very knowlegeable. I will be glad to help you out, or advise in any way. Its hard work, but worth it when you get the final results. Good luck!
another option would be to remove the inside paper, clean it up, reattach the hinges and use as is
Thank you for your advise. I was thinking also to just clean the outside as best I can and reline the inside with material. Hopefully it will look better. I am waiting for some warmer weather so I can work on it outside. Thank you again. Any advise is greatly appreciated.
good luck with the trunk, be glad to offer what little knowledge I have.
you have a beautiful trunk, pls try to save the embossed tin just tack it down for now, you may want to paint it later. I know its a family piece, but if you ever decide to sell please let me know. Im going to send you a link to show you what that embossing will look like fixed up
http://www.oakmeadowgroup.com/Trunkpattern.html
the first one on te right called scroll is i believe your pattern, would be beautiful in that teal and silver
Thank you for the link. I believe that one looks similar to my tin. It is very pretty the colour. Would the tin have to be sanded first. I definately want to keep the tin but there are some damaged places but I think that's what makes it look old. If I ever descide to sell I will let you know but as of now I am not thinking about selling. I love it too much. Hopefully when I am done cleaning it up it will look half as nice as the ones I have seen.
those worn places definitely add to the patina. There are sites out there that tell you how best to get rid of the rust. The best way I have found is with a wire brush, steel wool and a light mixture of vinegar and water. Be sure to rinse with water thoroughly every time you stop the "sanding" process. Its gonna take some time and patience so take your time and don't scrub too hard, you might bust a knuckle. Now the painting of the embossing is the tricky part.
Let me know if you get to that point and I'll give you some hints that have been passed to me.
Please keep me in mind if you ever sell, and please keep it nice and dry and cozy.
You will really enjoy it once you are through.
Most of the ones I've refinished I have given to my children or friends.
I have a few for sell, but they have some historical value and I'm scared to touch them
Send me a picture when you are through.
Senor_Trunk
by the way use a brass wire brush much gentler on the metal and 00 grade steel wool for polishing
Thanks again for your advise. It helps me to know what to use on my trunk cause I had no idea how to clean the tin. A wire brush will not scratch the tin? The wood that is yellow should I just sand that and stain or paint it? I will send pictures showing my progress.
Yea a brass brush would be much gentler. You can get small ones for a couple of $$ at lowes or home depot, probably local hardware store too.
are you talking about the slats on the outside, you should carefully remove them first (they make special tools for this, as you will find out the nails are bent inside) but don't have to remove them, 80 grit sandpaper to get the paint off and 220 grit to smooth it out then go at it. I wouldnt use an orbital sander, and only use a belt sander if you can't hand sand by hand use fine grit sand paper with a belt sander. Most times those slats are oak. So you can get something like minwax light oak finish or if you like it darker get early american.
The other option is to use tung oil and follow the direction, that will leave a more natural look and alot of people say it allows the wood to breathe.. If you use a finish, you should put on a coat of polyurethane after a few days.
The inside yellow I thought was paper, if not be very careful removing the picture, probably soaking it with water and try to get an edge under it while soft. I would test a small area first. If the yellow is paint thats its gonna be a choir. You could sand around the picture, being very careful. If you are going to stain then you would need to get to the bare wood (makes my arms hurt thinking about it) Or you could sand lightly put a wood primer on the yellow and paint your favorite color. The historically correct thing to do would be to get some type paper (wall paper or the such) or cloth and line the whole inside with that. But I would save that picture. Lining with paper is fairly simple, get some 3m spray on glue have your paper ready ,spray and attach your paper then trim. Would need to lightly sand first and remove any old paper. There are web sights that sell trunk paper that is historically correct and some i think have a pre glued back as do some wallpapers. Lining with cloth might be a little more tricky.
Hope this helps. Let me know if I can be of further help.
Some of the websites have step by step instructions on refinishing, like me they all have different opinions on how to do it. The most knowlegeable guy out there is marvin at thisoldtrun.com, but he doesn't have a restoration advice page, but if you want history he's the man, he has pictures on CW. For restoration advice I'd go to http://www.shenandoahrestoration.com/ guys name is gary. Both of these guys are real nice and both sell supplies. They will tell you a few things differently from me, but i like the way i do it. Reading Garys sight I forgot about using paint stripper for the inside. If you use paint striper on the slats, then i would definitely remove them first. Sorry about the rambling. Be glad to answer anything else.
Senor_Trunk
Oh sorry the yellow slats I meant. The yellow inside is paper. I will remove all the paper inside and try to reline with cloth. I definately want to save the picture but I was going to try removing the paper around it and leave it attached. I don't want to try and remove the picture. It already has alittle damage in the middle where the paper is torn. I think I will leave the slats on and sand them by hand. I like the idea of the tung oil. The brass brush is it around the size of a toothbrush or bigger? You are very helpful. Thank you.
the brush looks alot like a toothbrush. Be careful sanding the edges of the slats don't want to mess up that beautiful embossing. Glad to know thats paper on the inside, the picture is probably glued to the paper so i would take a utility knife and cut it out.
The paper is kinda hard to remove, you need to spray it down with water scape and repeat. The little pieces that you just can't seem to get sand them off. If the trunk has a musty or any other smell, mix in some vinegar or clorox, just enough to get rid of odors. After you remove the paper leave it open in the sun for a day or so to keep future mold from developing.. If you find an easy way to do cloth let me know, I'm no upholsterer and I'm trying to line one with cloth now.
I want pictures when you are through
by the way is that blue paint or paper in the tray
It is blue paper in the tray. It sounds very hard to make this trunk look good but I am willing to give it a try. I never thought I would do anything with it and it just sat in my shed for years and was also in my mother-in-laws shed for years too. It was her mother's. She used it for awhile until someone tried to break into it and that's how the hinges and metal were damaged along with the lock broken off. I hope to start working on it in another month when it is nice outside to work on so it can dry with the sun. I will let you know if I find an easy way to put cloth in. It may take me a few attempts but I am determined.
it is definitly hard work, and will take a while.
but be patient work slow and when you get frustrated then send me a note and i'll get you motivated.
you will be very proud when you get your results
Thank you. I know there will be many times that I will probably get frustrated and have to walk away for awhile. I may contact you quit abit once I get started. I may have alot more questions. I think removing the handle hardware will be a task of it's own. I was thinking of cutting a leather belt and using those pieces as part of the handles.
forgot about the handles, They will be tough.
I'll go into that later. Its gonna take a while to get to that point, it will be one of the last things you do